

To install a dash cam, first, mount it on your windshield. Then, connect it to a power source.
Installing a dash cam can enhance your driving safety and provide valuable evidence in case of accidents. This small device records your driving journey, capturing crucial footage. Whether you’re a daily commuter or a road trip enthusiast, a dash cam offers peace of mind.
It can deter insurance fraud and provide indisputable proof in traffic disputes. With simple installation steps, you can set up your dash cam without professional help. This guide will walk you through the process, ensuring your dash cam is securely mounted and properly connected. Follow these steps to enjoy the benefits of having a dash cam in your vehicle.

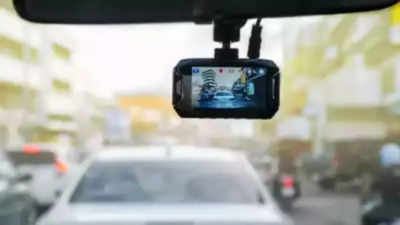
Credit: www.youtube.com
Introduction To Dash Cams
Dash cams are becoming essential gadgets for car owners. They provide evidence in case of accidents and help improve driving habits. Let’s explore what dash cams are and their benefits.
What Is A Dash Cam?
A dash cam is a small camera mounted on your car’s dashboard. It records video continuously while you drive. These devices capture every moment on the road.
Dash cams can have various features. Some record in high definition, while others have night vision. There are models with GPS tracking and motion detection too.
Benefits Of Installing A Dash Cam
Installing a dash cam offers several benefits:
- Accident Evidence: Dash cams provide clear video evidence in accidents.
- Insurance Claims: They help in quick and fair insurance claims.
- Prevent Fraud: Dash cams deter fraudulent claims and scams.
- Improve Driving: Reviewing footage can improve driving habits.
- Parking Surveillance: Some dash cams monitor your car when parked.
Choosing The Right Dash Cam
Installing a dash cam can protect you in case of accidents. But first, you must choose the right dash cam. This section will guide you through types and key features of dash cams. This will help you make an informed decision.
Types Of Dash Cams
Dash cams come in various types. Each type has its unique benefits. Here’s a table to help you understand:
| Type | Description |
|---|---|
| Single-lens Dash Cams | These record the road ahead. Simple and easy to use. |
| Dual-lens Dash Cams | These record both the road and the car interior. Great for rideshare drivers. |
| Rear-view Dash Cams | These focus on the back of the car. Useful for parking and reversing. |
Key Features To Consider
When choosing a dash cam, look for these key features:
- Resolution: Higher resolution means clearer video. Aim for at least 1080p.
- Night Vision: Ensures clear footage at night. Essential for night driving.
- Wide-Angle Lens: Covers more area. Look for at least 120 degrees.
- GPS: Tracks your location and speed. Useful for evidence.
- Loop Recording: Automatically overwrites old footage. Ensures continuous recording.
- G-Sensor: Detects sudden impacts. Automatically saves crucial footage.
- Wi-Fi: Allows easy transfer of footage to your phone.
- Parking Mode: Records while your car is parked. Protects against theft and vandalism.
Choose a dash cam with the features you need. This will ensure you get the best value and protection.
Gathering Necessary Tools
Installing a dash cam is easier with the right tools. Before starting, gather all necessary items. This ensures a smooth installation process. Here’s a guide to help you collect everything you need.
Essential Tools And Materials
- Dash Cam: The main device you will install.
- Power Cable: Connects the dash cam to the car’s power source.
- Mounting Kit: Usually comes with the dash cam. Includes suction cup or adhesive mount.
- MicroSD Card: Stores video footage. Ensure it has enough storage.
- Car Charger Adapter: Powers the dash cam through the cigarette lighter.
- Pry Tool: Helps hide cables under the car’s trim.
- Cleaning Wipes: Cleans the windshield for better mount adhesion.
Optional Accessories
- Hardwire Kit: Connects the dash cam directly to the car’s fuse box. Provides a cleaner look.
- Rear Camera: Records the view from the back of the car. Enhances overall security.
- GPS Module: Tracks the car’s location and speed. Useful for detailed recordings.
- External Battery Pack: Powers the dash cam without draining the car’s battery.
- SD Card Reader: Transfers footage from the dash cam to a computer.
| Tool/Material | Purpose |
|---|---|
| Dash Cam | Main recording device |
| Power Cable | Connects to power source |
| Mounting Kit | Attaches dash cam to windshield |
| MicroSD Card | Stores video footage |
| Car Charger Adapter | Powers the dash cam |
| Pry Tool | Hides cables under trim |
| Cleaning Wipes | Cleans windshield |
Credit: timesofindia.indiatimes.com
Preparing Your Vehicle
Preparing your vehicle is the first step to installing a dash cam. A clean and well-prepared area ensures a smooth installation. This guide helps you get your vehicle ready.
Cleaning The Windshield
A clean windshield ensures a clear view for the dash cam. Follow these steps to clean your windshield:
- Use a glass cleaner and a microfiber cloth.
- Spray the cleaner on the windshield.
- Wipe the windshield in a circular motion.
- Ensure there are no streaks or spots left.
Repeat the process if needed. A clean surface ensures the mount sticks well.
Determining The Best Mounting Spot
Choosing the right spot is crucial for optimal dash cam performance. Follow these guidelines:
- Place the dash cam near the center of the windshield.
- Ensure it does not obstruct your view.
- Position it behind the rearview mirror.
- Make sure it has a clear view of the road.
Mounting the dash cam correctly ensures better video quality and safety.
Mounting The Dash Cam
Installing a dash cam is a great way to protect yourself. The key step is mounting the dash cam properly. This ensures clear video footage and safety. Below is a step-by-step guide.
Installing The Suction Cup Mount
First, clean the windshield. Use a cloth to remove dust and dirt. This ensures the suction cup sticks well. Next, attach the suction cup mount to the dash cam. Twist it until it feels secure.
Now, find a good spot on the windshield. Place the suction cup near the rearview mirror. Press firmly to remove air bubbles. Twist the lock mechanism to secure it in place. This prevents the dash cam from falling.
Adjusting The Camera Angle
After mounting, adjust the camera angle. Tilt the dash cam to capture the road. Make sure it does not block the driver’s view. Use the live view feature to check the angle.
Ensure the horizon is level in the frame. Adjust until you see both the road and sky. This gives a balanced view in recordings. Lock the angle in place to prevent movement.
If your dash cam has a rear camera, adjust it too. Make sure it captures the rear view clearly. This helps in case of rear-end collisions.
| Step | Action |
|---|---|
| 1 | Clean the windshield |
| 2 | Attach the suction cup mount |
| 3 | Place the mount on the windshield |
| 4 | Adjust the camera angle |
Follow these steps for a secure installation. Your dash cam will be ready to record.
Routing The Power Cable
Installing a dash cam enhances your car’s security. Routing the power cable properly ensures a neat installation. Follow these steps for a clean setup.
Hiding The Cable
To keep your dash cam setup tidy, start by hiding the cable. Use the headliner, A-pillar, and car trims to conceal the cable.
- Gently pull back the headliner to tuck in the cable.
- Run the cable along the A-pillar, using trim tools if needed.
- Secure the cable with clips or adhesive pads.
Ensure the cable is not exposed. This keeps your installation looking professional.
Connecting To The Power Source
After hiding the cable, connect it to the power source. There are two main options: the car’s fuse box or the 12V socket.
| Power Source | Pros | Cons |
|---|---|---|
| Fuse Box |
|
|
| 12V Socket |
|
|
- For the fuse box, use an add-a-fuse kit.
- Identify a fuse that switches with the ignition.
- Insert the add-a-fuse and connect the dash cam cable.
If using the 12V socket, simply plug in the cable. Ensure the cable is not dangling. Use cable ties for a secure fit.
Setting Up The Dash Cam
Setting up your dash cam is crucial for capturing clear footage. Follow these steps to get your device ready for the road.
Configuring Settings
After mounting your dash cam, you’ll need to configure its settings. This step is important for optimal performance.
- Turn on the dash cam using the power button.
- Navigate to the settings menu using the device’s buttons.
- Adjust the resolution to the highest setting for the best video quality.
- Set the loop recording to overwrite old files automatically.
- Enable the G-sensor to detect sudden impacts.
Make sure to set the correct date and time. This ensures accurate timestamps on your recordings. Use the language setting to choose your preferred language.
Inserting The Memory Card
A memory card is essential for storing your dash cam footage. Here’s how to insert it correctly:
- Locate the memory card slot on the dash cam.
- Take a compatible microSD card (usually up to 64GB or more).
- Insert the card into the slot with the label facing up.
- Push the card in until you hear a click.
Once the card is inserted, format it through the dash cam’s settings menu. This step ensures the card is ready for use. Always check if the card is securely inserted.
Now, your dash cam is set up and ready to record. Enjoy a safer drive with your new device!
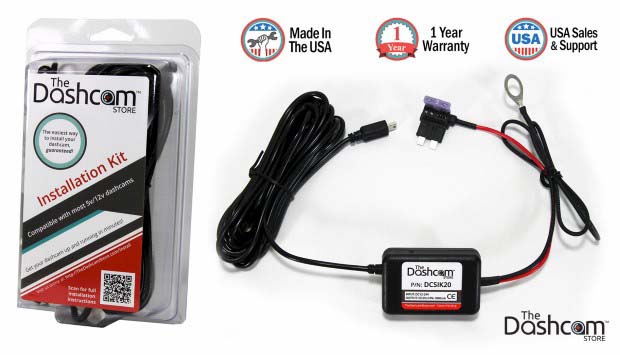
Credit: www.thedashcamstore.com
Testing And Troubleshooting
After installing a dash cam, it’s crucial to test and troubleshoot. This ensures your dash cam functions perfectly. Follow these steps to verify everything works as intended.
Checking Video Quality
First, check the video quality of your dash cam. Ensure the footage is clear. You should see license plates and road signs. Play the recorded video on your computer. Look for any distortions or blurriness. Adjust settings if the quality is poor.
- Check resolution settings.
- Test in different lighting conditions.
- Ensure the lens is clean.
Common Issues And Fixes
Sometimes, dash cams face common issues. Here’s a table of typical problems and their solutions:
| Issue | Fix |
|---|---|
| Dash cam not turning on | Check the power connection. |
| Video not recording | Ensure the SD card is inserted correctly. |
| Footage is blurry | Clean the lens and adjust the focus. |
Addressing these issues ensures your dash cam is reliable. Always keep your firmware updated. This can fix many issues automatically.
Maintenance Tips
Regular maintenance is crucial for the longevity of your dash cam. Proper upkeep ensures it records high-quality footage. Follow these simple tips to keep your dash cam in top condition.
Regular Cleaning
Dust and dirt can affect the dash cam’s lens. Clean the lens weekly for the best clarity.
- Use a microfiber cloth to avoid scratches.
- Gently wipe the lens in a circular motion.
- Avoid using harsh chemicals; they can damage the lens.
Don’t forget to clean the dash cam’s casing. Dust buildup can cause overheating.
Updating Firmware
Keep the dash cam’s firmware up-to-date. Updates often fix bugs and improve performance.
- Visit the manufacturer’s website for the latest firmware.
- Download the update file to your computer.
- Transfer the file to a memory card.
- Insert the memory card into the dash cam.
- Follow the on-screen instructions to install the update.
Regular updates ensure your dash cam runs smoothly. They also add new features.
Frequently Asked Questions
Do Dashcams Need To Be Hardwired?
No, dashcams don’t need to be hardwired. They can use the car’s cigarette lighter socket for power. Hardwiring provides continuous power and cleaner installation.
Where Does The Wire Go With A Dashcam?
The wire for a dashcam typically routes through the car’s headliner, down the A-pillar, and connects to the fuse box or power outlet.
How Do You Install A Dash Cam?
Installing a dash cam involves mounting it on your windshield, connecting it to a power source, and configuring settings. Ensure the camera has a clear view of the road. Follow the manufacturer’s instructions for the best results.
Where Should A Dash Cam Be Placed?
The best place for a dash cam is behind the rearview mirror. This position provides an unobstructed view of the road. It also minimizes distractions for the driver.
Conclusion
Installing a dash cam can enhance your driving experience and security. Follow this step-by-step guide for an easy setup. Remember to position the camera correctly and secure all connections. Enjoy peace of mind with your new dash cam, knowing you’re safer on the road.
Happy driving!